My thoughts and prayers go out to each and every family touched by today's tragedy in Connecticut.
There are no words to describe the grief that they are experiencing, or the sadness left in any of their hearts.
My eyes keep welling up at the thought...I am grateful for each day that I have with my students and my gratitude has been compounded after today.
Sending love and prayers to Connecticut.

Friday, December 14, 2012
Saturday, December 8, 2012
A Teacher's Brain Never Sleeps
So as I sit her, mostly conscious, on a Saturday morning....I find myself having to run through all of the things I need to do this weekend. What strikes me is that most weekends include a longer list of school-related project than anything else.
However, amidst all of the report cards to fill out and the weekly selection tests to finish grading, occasionally you find some gems to get you through to the next one.

However, amidst all of the report cards to fill out and the weekly selection tests to finish grading, occasionally you find some gems to get you through to the next one.
Monday, November 19, 2012
Blogging on the Go
Ok, so I got all kinds of motivated a week ago to post a blog (and for tradition's sake, apologize for being such an intermittent blogger), buy the site was down. Here's to iPhone apps that allow me to post on the run!
Bear with me as I try to figure out the ins and outs of the app....
I wanted to do a short little post about conferences. We finished those babies up a few weeks ago, but I know some schools in our area are waiting to do conferences until the time of first report cards.
In general, conferences are not a particularly enjoyable experience for me. Not that I dislike talking to the families, but I have a harder time talking to adults comfortably in my professional capacity. Fortunately, for nearly every difficult conference, I had two or more really positive conferences to balance them out. Nothing beats the feeling of singing the praises of a student who has been working particularly hard.
Last year, I kept a pile of student files on my desk in order of conference time. Call it inexperience or whatever else you like, but I didn't get deeply into the file as the conference progressed. I decided to blame the folders and switch my brainwaves for this year. Instead, I organized a binder by student number and filed each piece of conference paperwork behind that number. By having only one binder to deal with instead of 24 folders, I was able to keep my table far neater and to keep track of all additional paperwork that came up through the course of the meetings.
Add in a vase of tulips (orange, of course) and there you have it! Thankfully, conferences went off without a hitch, and now we are on to a lovely Thanksgiving break!
Here's hoping that another post pops up now that I have no excuses!
Monday, September 24, 2012
Weekly Organizers
At the beginning of summer, I posted here very lengthily, about keeping my classroom master copies organized. This is a process that will inevitably be helpful and convenient if I ever mosey on back to second grade some day. It has already helped a close friend who moved up to second grade at a different school and didn't know where to start.
However, as I have known since I started the project, and many have commented about since, this is not a convenient process for the day-to-day organization.
I don't know about you, or your school's policies, but we are quite strapped for copy uses. This means that I try to save master copies as much as possible throughout the year. That was one of the main motivators when I found out I wasn't teaching second this year. I wanted to ditch the extra copies and condense a huge file drawer down...but when it comes down to it during the year, I want to hoard as much as possible.
Generally, I keep extra copies of things in that aforementioned file drawer. They are in hanging files organized by month and within the month are folders with subjects. I paperclip multiple copies together and just drop them in where they are needed. With 24 kids in a class, I always make 25 copies so that I can have an emergency master to go back to if necessary.
But what about the copies for each day of the current week?
This summer, I found a small rack with 6 hanging folders in it. Of course the orange rack was what sold me, but with 6 folders, I have put it to good use. There is one folder for each day of the week and one for "next week." As a team, we try to stay pretty on top of things and make copies in advance where we can. Those copies get stored in "next week" and divvied up on Friday afternoon. This makes each day simple.
In the morning, I go to the folder marked for that day and pull all the copies I will need for the whole day. I even try to put in blank writing paper, or spelling test half-sheets, etc. in the files so that those are all in one place when I need them.
All in all, so far this has proven far more convenient for me than my stacked racks from last year. I doubt that it is the rack's fault though...and rather that I am more experienced in what I need to do; however, it is nice to have everything at a glance for each day!
What do you do to keep your daily self organized?
Sunday, September 23, 2012
Ewok-About
In my quest to become organized this year, to get to know my kids, to assess their needs, and to still be super-teacher....I have merely thought many times about blogging...rather than sitting in front of the computer and actually blogging. But! Here it is, as promised! A quick walk-about of my classroom (as it looks now, even with kids involved!) and all of its orange, polka-dotty goodness!
My wonderful friend picked me up an Ewok from Disneyland this summer, and it has a place of honor in my classroom...so he also got a place of honor in all of my pictures. We talk on the first day of school about ourselves and our procedures and all sorts of things, so I like to have a couple of pieces that represent "me" on my walls/desk/etc. Last year I printed a small photo-collage and put that with a picture of my family. This year I added a little Harry Potter and Firefly reference. I found frames at the dollar store and printed "posters" from my computer. I dug out my t-pins and used them to hang the frames on my wall. Worked well with bulletin board walls - questionable with hard walls, I'm sure.

Starting next week, we will finally begin classroom Boggle. The kiddos are super excited about it, which must mean that I am a great salesperson! It will be nice, as I have many high-achievers who are naturally very quick at certain activities. Boggle will not only give them something extra to think about when they're done, but it will also be a nice, "Hey, thanks for bearing with me while we slowly learn procedures" reward.

I had to laugh at Back to School Night this week! A few parents asked if I got my ideas on Pinterest :) Must be that obvious! But these little dollar store objective frames have already been a wonderful piece in my classroom design. I change the objectives each day, and write the vocabulary up next to the frames for reference.

Covering my storage cabinet with paper was one of the best decisions this summer. It not only covers the off-colored cabinet (since everything has to match), but it also provided a nice place to do a magnetic job chart. I found my chart pictures at Teaching in Flip Flops.

Ahhh, the 9-hour birthday wreath! It currently hangs in a place of non-honor as it waits for Tuesday and the first student birthday of the year!

Last year, when I got my job, my parents brought bunches of things that were taking up space in the garage to my classroom. (not everything's out yet, sorry Dad.) This year, I spruced up some of those things. To make my drawers look a little more cohesive, I put scrapbook paper on the inside of them facing out. This way, you can't see what's in the drawers, and they look much more "together." Pardon the post-its...since I can't see into the drawers, I label them....but I haven't changed my summer post-its to the nice labels yet.

My Twitter wall! The kiddos are LOVING tweeting so far! As we get into more stories, I have ideas floating around in my head...but for now, it has been pretty subdued. They had a blast leaving tweets for their parents to read at Back to School Night though.

It has been nice having the kids highlight their name as they turn in papers. While it hasn't cut back on unfinished work, it has cut down on nameless work. Since we did a lot of text highlighting in second grade, I didn't anticipate having any trouble with name highlighting in third grade...which means that I have now had to backtrack a smidge and teach the class that "highlight your name" does not mean "trace every letter with a highlighter."

Over at Clutter Free Classroom I found the idea of putting up student work with a scrapbook paper backing. Last year, I had to measure and level everything I put up. This year, I already have a place of honor for each student's writing, and will never have to level anything! Plus, it leaves a nice space for a name label and a picture.
 Right now, we have first day of school pictures up :)

As I mentioned before, I have the 4 C's of common core posted in my room. Collaborators, Communicators, Creators, and Critical Thinkers. These are the four things that we should be teaching our students to be by the time they are out of school. On top of that, I am in love with my orange polka-dot ribbon that I used to make the frames! So much fun! The only ribbon I bought this summer that was not from the dollar bin...and totally was worth it!

Finally, my wonderful and amazing new backpack racks! I am in love with these things! They have made my life easier on so many levels and I get a smile on my face every time I look at them! Last year, we kept backpacks on a bookshelf at the back of the room, and later on the backs of chairs. In the shelf, they were more often on the floor than put away; and on the chairs, I was more often tripping over them than anything. This year, I was given these beautiful racks and the organization factor is huge!

So that seems to be it for the classroom walk-about. Probably there is more...I know that I am always adding more...but for now, it still looks like it did before school started (a feat which I am proud of now that kiddos are in the picture). With luck, things will stay nice and organized all year...cross your fingers!
My wonderful friend picked me up an Ewok from Disneyland this summer, and it has a place of honor in my classroom...so he also got a place of honor in all of my pictures. We talk on the first day of school about ourselves and our procedures and all sorts of things, so I like to have a couple of pieces that represent "me" on my walls/desk/etc. Last year I printed a small photo-collage and put that with a picture of my family. This year I added a little Harry Potter and Firefly reference. I found frames at the dollar store and printed "posters" from my computer. I dug out my t-pins and used them to hang the frames on my wall. Worked well with bulletin board walls - questionable with hard walls, I'm sure.

Starting next week, we will finally begin classroom Boggle. The kiddos are super excited about it, which must mean that I am a great salesperson! It will be nice, as I have many high-achievers who are naturally very quick at certain activities. Boggle will not only give them something extra to think about when they're done, but it will also be a nice, "Hey, thanks for bearing with me while we slowly learn procedures" reward.

I had to laugh at Back to School Night this week! A few parents asked if I got my ideas on Pinterest :) Must be that obvious! But these little dollar store objective frames have already been a wonderful piece in my classroom design. I change the objectives each day, and write the vocabulary up next to the frames for reference.

Covering my storage cabinet with paper was one of the best decisions this summer. It not only covers the off-colored cabinet (since everything has to match), but it also provided a nice place to do a magnetic job chart. I found my chart pictures at Teaching in Flip Flops.

Ahhh, the 9-hour birthday wreath! It currently hangs in a place of non-honor as it waits for Tuesday and the first student birthday of the year!

Last year, when I got my job, my parents brought bunches of things that were taking up space in the garage to my classroom. (not everything's out yet, sorry Dad.) This year, I spruced up some of those things. To make my drawers look a little more cohesive, I put scrapbook paper on the inside of them facing out. This way, you can't see what's in the drawers, and they look much more "together." Pardon the post-its...since I can't see into the drawers, I label them....but I haven't changed my summer post-its to the nice labels yet.

My Twitter wall! The kiddos are LOVING tweeting so far! As we get into more stories, I have ideas floating around in my head...but for now, it has been pretty subdued. They had a blast leaving tweets for their parents to read at Back to School Night though.

It has been nice having the kids highlight their name as they turn in papers. While it hasn't cut back on unfinished work, it has cut down on nameless work. Since we did a lot of text highlighting in second grade, I didn't anticipate having any trouble with name highlighting in third grade...which means that I have now had to backtrack a smidge and teach the class that "highlight your name" does not mean "trace every letter with a highlighter."

Over at Clutter Free Classroom I found the idea of putting up student work with a scrapbook paper backing. Last year, I had to measure and level everything I put up. This year, I already have a place of honor for each student's writing, and will never have to level anything! Plus, it leaves a nice space for a name label and a picture.


As I mentioned before, I have the 4 C's of common core posted in my room. Collaborators, Communicators, Creators, and Critical Thinkers. These are the four things that we should be teaching our students to be by the time they are out of school. On top of that, I am in love with my orange polka-dot ribbon that I used to make the frames! So much fun! The only ribbon I bought this summer that was not from the dollar bin...and totally was worth it!

Finally, my wonderful and amazing new backpack racks! I am in love with these things! They have made my life easier on so many levels and I get a smile on my face every time I look at them! Last year, we kept backpacks on a bookshelf at the back of the room, and later on the backs of chairs. In the shelf, they were more often on the floor than put away; and on the chairs, I was more often tripping over them than anything. This year, I was given these beautiful racks and the organization factor is huge!

So that seems to be it for the classroom walk-about. Probably there is more...I know that I am always adding more...but for now, it still looks like it did before school started (a feat which I am proud of now that kiddos are in the picture). With luck, things will stay nice and organized all year...cross your fingers!
Saturday, September 8, 2012
Orange Polka Dot Love
Many, many apologies, Blogging world! My absence has no excuse...except, wait...I redesigned my whole classroom.
I think I have mentioned before that we turn in our keys in June and don't get them back until the end of August. This means that all of the 150 hours I did over the summer for my class work was in no way actually about putting my room together.
It probably isn't an exaggeration to say that I spent like 120 hours in my room when I got my keys...
But it worked out! I did this:

I marked everything that was from Pinterest....There will be a whole tour of the room coming soon, but above is only pieces.

Over at Clutter-Free Classroom there is a wonderful post from the summertime that inspired classroom jealousy in my heart. Because of that post, I spent an entire eight hours stapling sheets to my walls! And man, oh, man...am I happy with my sheets! As you can see from the photo above, the sheets go precisely from ceiling to floor. Anyone who has their classroom in a portable understands how difficult (and annoying, and time-consuming, and patience testing...I could go on) it can be to "define" your bulletin board space. If anyone is as OCD as I am, then they likely have a leveling app on their phone or perhaps an actual level in their classroom handy to do boards....the sheets took all of that away!
Following her directions though, I did let the sheets go through the dryer first to get the wrinkles out. My sheets were so successful that they seem to have inspired sheet-usage in friends' classrooms :) To additional great successes!

At the moment, the front of my classroom is my favorite thing to look at! I borrowed the idea for a homework hotline (under the whiteboard) for this year. In the new world of Thirdgradia that I have entered, we collect homework most days. This is different from Second Grade Land where it was only on Fridays, so checking things in was not a difficult task. In order to keep up with the homework papers, I have the kids clip their work to their number on the ribbon (another OCD moment where a ruler and a level were involved), which allows me to immediately check and see who did their homework and who did not.
Note: If one of my lovelies did not turn in their homework, they take a little field trip to the back of my room and write to me why it isn't at school in my "No Homework Folder." I foresee this being a valuable asset at conferences next month.
I also am proud of my magnet board that I made by putting bulletin board paper over the ugly tealish-blue of my storage cabinet. This made a perfect wall for my job chart, since I made all of the pieces magnetic.
Finally, I am really proud of the common core C's up above the board. My wonderful coworker came up with the idea of listing out the over-arching concepts now (before we fully turn over to common core) to really ensure that we are leading our students to be communicators, critical thinkers, collaborators, and creators. Plus (even though you can't see from this picture), I found orange polka-dotted ribbons to use as boarders around the 4 C's! How could that ribbon not be purchased?
I will do detail pictures and a whole classroom tour next week, now that kiddos are coming in and getting settled.
After three days of school, I am so proud of my class that I am gushing about them all the time! This should be a wonderful year!
Oh, and a quick P.S.
If you're looking for a great blog to follow, check out my lovely friend over at Musings from the Foreign Teacher! An American teacher in England who is quite possibly the reason for my love of polka dots <3
Wednesday, August 1, 2012
Birthday Wreath-view
Wow vacation! The whole last month has been a whirlwind! I look up and it's August. Good grief, there is too much to do!
If you are like me, throughout this summer much of my to-do list has consisted of projects I discovered on Pinterest...trying them out, seeing if they work, wondering if they will fit the different aspects of my classroom. So far, all of those projects have been very successful (can't ask for more!), but I finally found one that I'm not so sure about.
Don't get me wrong, it is cute, it is exactly what I was trying to go for, but it took about 9 hours to complete....
The Birthday Wreath.
If you've seen the picture on Pinterest, it looks pretty easy to accomplish: foam circle wreath, curling ribbon, scissors...go team! Maybe I'm just slow, but curling that much ribbon was incredibly tedious.
Below is a tutorial of everything I did to make the adorable project. Let's just say, I am super glad that it turned out well, because otherwise I would be pretty upset with the amount of time spent sitting on the couch curling ribbon.
Start with your favorite colors of curling ribbon. I wanted to toss in a turquoise, but it wasn't available where I was shopping and I was really impatient. I also got a 6" styrofoam ring from Michaels for the foundation.

I chose to gather a length of each color, fold the cluster in half and tie it together with a shorter length of ribbon, then curl. This allowed me to tie the clusters of ribbon to the styrofoam ring. The tutorial that I read recommended using staples to attach the pieces of ribbon...again, impatient and I didn't have staples at home.


I think the tying worked better than staples would. Plus, the added benefit of not needing to hide anything. Just curl the length you used to tie, and it hides itself!

After a while, it starts to look like this:

Remember my mentioned impatience?
At this point, it was hard to see progress and that bored feeling started to kick in. In an effort to feel like more progress was made, I pulled some of the fluffy, curly ribbon further down the ring and tied it in.

While that made the wreath slightly less puffy, the effect wasn't lessened, so it was a process that continued throughout.
Flash forward, to completing the ribbon (as I have said the words "ribbon" and "curling" too much up until now)....I filled the final part with a cloth ribbon to create a hanger.
I plan on hanging this wreath on the front of the birthday-students' desks, so a hanger is perhaps important.

(This was the point where I accidentally broke the wreath and had to pin it together. Should you decide to be bold enough to create this time-consuming project, I recommend keeping some pins on hand. They also would help to pin down those annoying pieces that fall slightly out of line.)
The wreath was cute, but I wanted a little something more to complete it...I headed for the scrapbook paper and made a template for a birthday hat.

I rolled it up and used scrapbook adhesive to keep it together.

For the final touch, I added a little bobble at the top of the hat.
I tied together a little bunch of green ribbon and secured it with a long length of orange.

Just thread the ribbon through the top of the hat until that little bit of green sticks out the top.

Finally....finally, (this, I swear, was 9 hours later) use that length of ribbon to tie the hat onto the wreath.

The hat is not incredibly secure and may fall off at some point...I will be waiting with pins to attempt to reattach!
OR, I might just tie a big, big bow onto it for that "something more" and call it a day.
Like I said, cute project! Turned out nicely, fits the purpose....took far longer than I anticipated.
Make sure that you have tons of time on hand, and tons of patience.
Alright, I now have a date with my new pink/white polka dotted glue gun and some clothespins!
Happy summer projecting!
Thursday, July 19, 2012
Pinterest Addict
Alright, I'll admit it:
I'm addicted to teaching blogs and pinterest.
Big time.
I think it has something to do with the fact that I have a lot of rearranging that I would love to be doing in my classroom, but my keys are turned in and locked away. Sigh.
As I've mentioned a million times before, I love, love, love Ladybug's Teacher Files; however, she is on vacation right about now. Her trip is perfectly timed with my mental obsession about my classroom reorganization...and now I am pouring over the Clutter Free Classroom !
The post that is linked is what has inspired a whole lot of online shopping: using sheets as bulletin board backgrounds.
Genius.
Ages ago, a former teacher of mine recommended using fabric to cover boards. While I also agreed that this was a fantastic idea, my OCD kicked in and I could see crooked edges...which would drive me nuts. So, I just finished a date with AnnasLinens.com that resulted in three brown sheets (to match my dots on chocolate colors) for $20! I shall report the results once I have returned to the land of the classroom.
Otherwise, I just finished today's Pinterest project of the day, and it worked out perfectly! With that Pinterest obsession I mentioned, I've seen a whole lot of pins where cheap frames are used to display lesson objectives. Seemed easy enough!
Math Teacher Friend and I took a trip to the Dollar Tree and Michael's today to buy scrapbook paper and frames.


Michael's was having a 50% off sale on their scrapbook paper (plus the teacher discount), so I got very adorable paper to frame! (Sadly no polka dots, but awesome orange patterns.)

After dismantling the frame, I traced the cardboard insert so the size would be marked properly.

In order to have sharp lines, and create enough layers so things wouldn't slip around, I opted to fold along my pencil lines rather than cut. It worked out really well, since the $1 frames needed a little extra help to make everything fit nicely.

And look! Cute little dry erase board! Perfect for writing eye-catching lesson objectives on and sticking on the white board! I do anticipate using black markers when they're actually displayed; however, blue is all I had on me.

Now all that is left is to figure out a nice configuration and to get them onto the white board! I'm also tossing some pink and blue in with my orange this year (again, to match the dots and chocolate), so I made sure to make the "objectives" sign in a different color.

And again, I leave you with the tease of my interactive notebooking research. I've been in the trenches looking, but I have not yet convinced myself that I want to implement it into my math program. We shall see!
Monday, July 16, 2012
Anchor Chart Academy
Oh summer....you are far too wonderful!
I have been enjoying my days playing with markers, colored pencils, and posters. Posters, posters, posters...
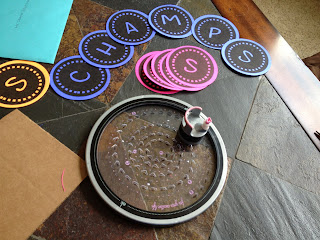
This 150 hours of classroom work thing has been rather successful so far (80 hours down) as I prepare charts, decorations, and documents for myself and my coworkers. My circle cutter and I did some bonding way back in June, and I finally got those circles adhered to their respective posters.
As promised: CHAMPS Posters!

I've mentioned it before, but we use CHAMPS for our classroom management program. Throughout the activities of the day, we make sure to explain our expectations for (C)onversation, (H)elp, (A)ctivity, (M)ovement, (P)articipation, and (S)uccess. These expectations are displayed on the board for students to reference when they need a reminder.
This summer's CHAMPS party consisted of creating these charts for our whole third-grade team. (dibs on orange!) One of my teammates came up with this great format last year, and we really wanted to keep our expectations the same across the grade level while we also use the Walk to Learn model this year. Her format is particularly wonderful because it prominently displays all of the expectations, and each one can be mixed and matched by moving clothespins around in their respective areas.
Additionally, I've been avoiding the focus wall chore and drawing up some posters that I found on Pinterest. All that art training I have under my belt has helped me to make some very accurate recreations!

We do a huge focus on writing in third, so I really wanted to have a cute chart up!

Way back during the school year, I posted here about our whole school learning about metacognition. One of those strategies involves using paint chips to help students classify how they are feeling about certain assignments. By marking the darker color on the chip, students show that they are not feeling 100% (in the "dark"); marking the lighter color, students show that they are confident in themselves ("it's all clear!").
Yes, these can be flipped around and used in whatever color gradation you wish...but the point is, I want to implement this strategy with the previous poster so that the kiddos can explain how they are feeling throughout the many different concepts of the day.


There are several more academic ones sitting on my desk, but I risk being too picture-heavy this time around....plus, I just wanted to toss in the birthday sign for my friend's baby...because that was fun to play with :)
Soon to come: Exploration of the interactive notebook...and more posters...possibly another focus wall...!
I have been enjoying my days playing with markers, colored pencils, and posters. Posters, posters, posters...
This 150 hours of classroom work thing has been rather successful so far (80 hours down) as I prepare charts, decorations, and documents for myself and my coworkers. My circle cutter and I did some bonding way back in June, and I finally got those circles adhered to their respective posters.
As promised: CHAMPS Posters!

I've mentioned it before, but we use CHAMPS for our classroom management program. Throughout the activities of the day, we make sure to explain our expectations for (C)onversation, (H)elp, (A)ctivity, (M)ovement, (P)articipation, and (S)uccess. These expectations are displayed on the board for students to reference when they need a reminder.
This summer's CHAMPS party consisted of creating these charts for our whole third-grade team. (dibs on orange!) One of my teammates came up with this great format last year, and we really wanted to keep our expectations the same across the grade level while we also use the Walk to Learn model this year. Her format is particularly wonderful because it prominently displays all of the expectations, and each one can be mixed and matched by moving clothespins around in their respective areas.
Additionally, I've been avoiding the focus wall chore and drawing up some posters that I found on Pinterest. All that art training I have under my belt has helped me to make some very accurate recreations!

We do a huge focus on writing in third, so I really wanted to have a cute chart up!

Way back during the school year, I posted here about our whole school learning about metacognition. One of those strategies involves using paint chips to help students classify how they are feeling about certain assignments. By marking the darker color on the chip, students show that they are not feeling 100% (in the "dark"); marking the lighter color, students show that they are confident in themselves ("it's all clear!").
Yes, these can be flipped around and used in whatever color gradation you wish...but the point is, I want to implement this strategy with the previous poster so that the kiddos can explain how they are feeling throughout the many different concepts of the day.


There are several more academic ones sitting on my desk, but I risk being too picture-heavy this time around....plus, I just wanted to toss in the birthday sign for my friend's baby...because that was fun to play with :)
Soon to come: Exploration of the interactive notebook...and more posters...possibly another focus wall...!
Sunday, June 24, 2012
5 Things You Need to Know About Me....
Holy cow! Two days in a row with a blog post?!
Actually, I wanted to post about this yesterday, but got all caught up in the bindery-goodness. And now, this is the perfect time for a teeny-tiny blog as I hydrate for a quick run :)
At the very end of the school year, in the midst of struggling to keep the attention of my class as well as keep quiet the fact that we were all moving up to third grade...I decided to adapt an assignment that many teachers do during the last week of school. The norm is that each student writes a letter to the up-and-coming kids for next year's _____Grade class...However, since next year will not be the same grade in my room, I had my class write down 5 things that next year's class needed to know about me.
The results were amazing!
Here is a smattering of some of them:
*Try to whisper when the door is open. (We are in a very cemented hallway that kinda echoes when the door is open)
*Have fun with art projects.
*Be a fantastic, excellent Stallion. (I now plan on telling everyone to "stay excellent" next year)
*Don't yell so loud that everyone can hear you. (yell quietly, please)
*She is super smart.
*She can see everything. (Remember that!)
*She pays attention to you.
*Be nice to each other.
*Don't be silly...but sometimes.
*Do not punch. (clearly kicking is okay)
*Never tell on other people, only if dead or dying in class. (HA!)
*Do not do things wrong on purpose. (only on accident is acceptable)
*Don't act like a first grader.
And my favorite.....
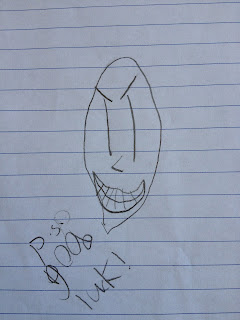
When you go to a play in the MPR, don't talk to your neighbor or else she will give you the eye.
I am indeed well known for "the eye."
Perhaps that is why this strange illustration appeared at the end of one note:
Actually, I wanted to post about this yesterday, but got all caught up in the bindery-goodness. And now, this is the perfect time for a teeny-tiny blog as I hydrate for a quick run :)
At the very end of the school year, in the midst of struggling to keep the attention of my class as well as keep quiet the fact that we were all moving up to third grade...I decided to adapt an assignment that many teachers do during the last week of school. The norm is that each student writes a letter to the up-and-coming kids for next year's _____Grade class...However, since next year will not be the same grade in my room, I had my class write down 5 things that next year's class needed to know about me.
The results were amazing!
Here is a smattering of some of them:
*Try to whisper when the door is open. (We are in a very cemented hallway that kinda echoes when the door is open)
*Have fun with art projects.
*Be a fantastic, excellent Stallion. (I now plan on telling everyone to "stay excellent" next year)
*Don't yell so loud that everyone can hear you. (yell quietly, please)
*She is super smart.
*She can see everything. (Remember that!)
*She pays attention to you.
*Be nice to each other.
*Don't be silly...but sometimes.
*Do not punch. (clearly kicking is okay)
*Never tell on other people, only if dead or dying in class. (HA!)
*Do not do things wrong on purpose. (only on accident is acceptable)
*Don't act like a first grader.
And my favorite.....
When you go to a play in the MPR, don't talk to your neighbor or else she will give you the eye.
I am indeed well known for "the eye."
Perhaps that is why this strange illustration appeared at the end of one note:

Saturday, June 23, 2012
How to Start Your Summer Vacation
Ok, let's see if we can get through this post without my computer getting all screwy!
(*UPDATE: By the end of this post, I had to hook up my laptop to my television so that I could use it as a monitor.)
Yes, I am terribly consistent at blogging (ha), but between the project I am about to share and Apple telling me that I need a new display for my laptop, it feels legitimate that I haven't blogged in two weeks.
Oh, and summer.
Let's not forget the pull to do nothing...that's a big factor too.
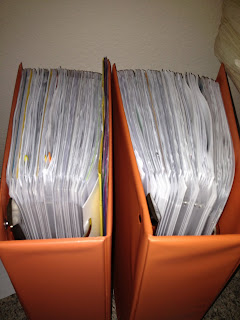
In any case, I have been in the midst of a massively gigantic project: organizing all of the master copies for second grade.
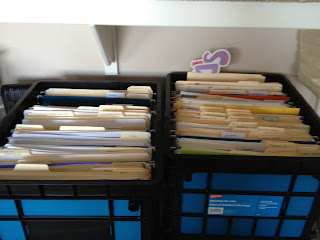
Two file boxes of papers have now been condensed down to two 3" binders. Hooray! I anticipated this job to be simple, as I already had my papers organized by month and subject. While typing the information for the labels and printing them took about an hour, the remainder of the project took somewhere in the neighborhood of 18-20 hours to complete.
Mind you, this is because (as we know) I am ridiculous and wanted to create all of the dividers myself.
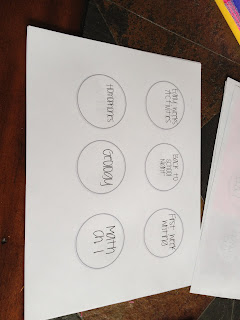
Start by creating a circle design in powerpoint, and type the divider labels into the template.
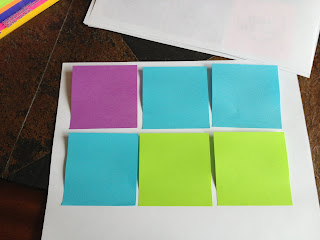
Next, place post-it notes over the circles in whatever pattern you want. I color coded my binder so that each color reflected a subject.
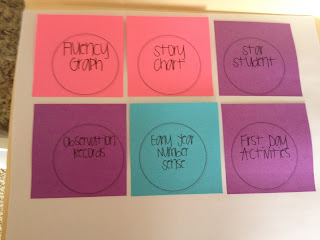
Now for the fun part! Stick the post-it-noted paper back into your printer! Best idea ever! Thank you Ladybug's Teacher Files! Now all of my tabs matched in size and in handwriting.
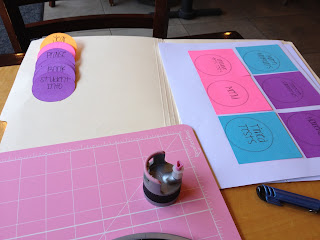
At this point, the ridiculousness sort of began. I now had labels for months, as well as labels for every subject that we covered for the whole year. They were all printed nicely on post-its and looked beautiful....but all of these had to be cut out. Yay. The trusty circle cutter came out for this big job. Circle labels are my favorite. They turn out so consistently. Sometimes I have issues with my straight edge slide cutter because things don't line up properly and lines aren't entirely parallel.
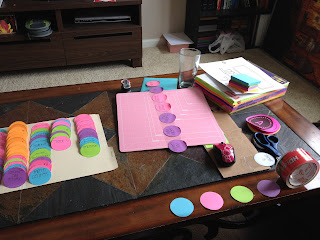
From where I sit, I am about 20 minutes away from the nearest laminating machine. Cost of gas and cost of lamination taken into consideration, I had some HD Clear packing tape handy and opted for that cheap form of fake-laminating. It actually wound up working better than if I had laminated them because I was able to leave a strip of the sticky post-it exposed. This allowed me to store them neatly together until I was done, as well as to carefully position them onto the card stock divider sheets in perfect alignment.
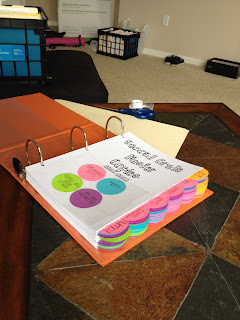
Toss in a handy cover sheet, and now we are all ready to load it up!
That's right! Up until this point, the hours of organization were spent creating the framework to organize! Hooray!
From this point on, it was just a matter of sliding my masters into sheet protectors and placing them into their respective binder category. Which took a good amount of time sitting in front of the TV...practicing my multi-tasking...
In the end, one binder was not enough, and I had to make another trip to Staples to pick up a second....and if we're being realistic, I probably over-squeezed into both...because having a third binder that didn't match in size was not an option.
And, for all of you who are thinking, "Why not scan all of this?"
I thought of that.
About 3/4 of the way through making the dividers.
Plus...I would have to print out a master copy anyway when we got to needing that activity in the future. Ultimately, I am not teaching second grade next year, and my classroom doesn't have much storage. So now, instead of storing two file crates full of junk, I only need to find space for two binders stuffed with junk!
Now on to the next 125 hours of my 150 hour independent study! Bring on the grade level CHAMPS posters!...and some more circle cutter bonding.
(*UPDATE: By the end of this post, I had to hook up my laptop to my television so that I could use it as a monitor.)
Yes, I am terribly consistent at blogging (ha), but between the project I am about to share and Apple telling me that I need a new display for my laptop, it feels legitimate that I haven't blogged in two weeks.
Oh, and summer.
Let's not forget the pull to do nothing...that's a big factor too.
In any case, I have been in the midst of a massively gigantic project: organizing all of the master copies for second grade.

Two file boxes of papers have now been condensed down to two 3" binders. Hooray! I anticipated this job to be simple, as I already had my papers organized by month and subject. While typing the information for the labels and printing them took about an hour, the remainder of the project took somewhere in the neighborhood of 18-20 hours to complete.
Mind you, this is because (as we know) I am ridiculous and wanted to create all of the dividers myself.

Start by creating a circle design in powerpoint, and type the divider labels into the template.

Next, place post-it notes over the circles in whatever pattern you want. I color coded my binder so that each color reflected a subject.

Now for the fun part! Stick the post-it-noted paper back into your printer! Best idea ever! Thank you Ladybug's Teacher Files! Now all of my tabs matched in size and in handwriting.

At this point, the ridiculousness sort of began. I now had labels for months, as well as labels for every subject that we covered for the whole year. They were all printed nicely on post-its and looked beautiful....but all of these had to be cut out. Yay. The trusty circle cutter came out for this big job. Circle labels are my favorite. They turn out so consistently. Sometimes I have issues with my straight edge slide cutter because things don't line up properly and lines aren't entirely parallel.

From where I sit, I am about 20 minutes away from the nearest laminating machine. Cost of gas and cost of lamination taken into consideration, I had some HD Clear packing tape handy and opted for that cheap form of fake-laminating. It actually wound up working better than if I had laminated them because I was able to leave a strip of the sticky post-it exposed. This allowed me to store them neatly together until I was done, as well as to carefully position them onto the card stock divider sheets in perfect alignment.

Toss in a handy cover sheet, and now we are all ready to load it up!
That's right! Up until this point, the hours of organization were spent creating the framework to organize! Hooray!
From this point on, it was just a matter of sliding my masters into sheet protectors and placing them into their respective binder category. Which took a good amount of time sitting in front of the TV...practicing my multi-tasking...
In the end, one binder was not enough, and I had to make another trip to Staples to pick up a second....and if we're being realistic, I probably over-squeezed into both...because having a third binder that didn't match in size was not an option.
And, for all of you who are thinking, "Why not scan all of this?"
I thought of that.
About 3/4 of the way through making the dividers.
Plus...I would have to print out a master copy anyway when we got to needing that activity in the future. Ultimately, I am not teaching second grade next year, and my classroom doesn't have much storage. So now, instead of storing two file crates full of junk, I only need to find space for two binders stuffed with junk!

Now on to the next 125 hours of my 150 hour independent study! Bring on the grade level CHAMPS posters!...and some more circle cutter bonding.

Subscribe to:
Posts (Atom)